
The Plustek OpticFilm 8200i SE is the best dedicated film scanner on the market. It features a dedicated infrared scanning channel that allows for the removal of dust and scratches from your scans. The 8200i SE also has a high-resolution sensor that produces superb image quality. And if you need to scan slides or negatives, the 8200i SE comes with an integrated slide holder.
Note: Plustek has recently released a new model with the same model name (Plustek OpticFilm 8200i) that is currently incompatible with VueScan so it’s hard to know whether you have the Plustek 8200i that is compatible with VueScan or the one that isn’t.
When it comes to scanning film and slides, the Nikon CoolScan 5000 is the gold standard. Unfortunately, Nikon no longer makes them, which means your only option is to buy a used scanner.


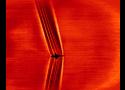
In the wake of recent success with air-to-air schlieren photography using the speckled desert floor as a background, researchers at NASA’s Armstrong Flight Research Center, Edwards, California, are now looking to the heavens for backgrounds upon which to capture images of supersonic shock waves using ground-based cameras. A bright light source and/or speckled background – such as the sun or moon – is necessary for visualizing aerodynamic flow phenomena generated by aircraft or other objects passing between the observer’s camera and the backdrop. This patent-pending method, made possible by improved image processing technology, is called Background-Oriented Schlieren using Celestial Objects, or BOSCO.
Flow visualization is one of the fundamental tools of aeronautics research, and schlieren photography has been used for many years to visualize air density gradients caused by aerodynamic flow. Traditionally, this method has required complex and precisely aligned optics as well as a bright light source. Refracted light rays revealed the intensity of air density gradients around the test object, usually a model in a wind tunnel. Capturing schlieren images of a full-scale aircraft in flight was even more challenging due to the need for precise alignment of the plane with the camera and the sun.
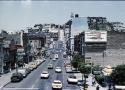
Old film rolls from flea markets, scanned and put online. Someone's vacations, birthdays, random Tuesdays — forgotten in a drawer for decades. I don't know where or when these were taken. Help me figure it out.
These are the photos nobody thought were worth keeping — and they're the most honest record of how people actually lived. A roll of Agfa from 1968 could only be from 1968. Putting these online is the only shot at getting a photo back to the people in it.
𝗖𝗢𝗟𝗢𝗥 𝗔𝗖𝗖𝗨𝗥𝗔𝗖𝗬, 𝗗𝗘𝗙𝗜𝗡𝗘𝗗 𝗗𝗘𝗧𝗔𝗜𝗟: Ensure accurate, consistent color from one shot to another, across different cameras, lenses, and lighting environments, plus capture every detail with optimal RAW process in- batch processing
𝗕𝗨𝗗𝗚𝗘𝗧 𝗙𝗥𝗜𝗘𝗡𝗗𝗟𝗬, 𝗙𝗘𝗔𝗧𝗨𝗥𝗘-𝗥𝗜𝗖𝗛: It features 24 spectrally engineered color targets and a grey face target, all near/within the sRGB gamut to ensure compatibility with a wide range of devices. Perfect for visual comparisons and custom white balance adjustments.
Whether you’re capturing product shots for an online store, filming a documentary, or just snapping portraits, color accuracy matters. The problem often lies in your white balance.
Here’s the good news: there’s a simple, affordable tool that solves this a grey card.
In this article, you’ll learn how to use grey cards and white balancing for accurate color in photography and video.

the single most powerful piece of advice for any photographer learning about color is to shoot in RAW format. A JPEG file processes the white balance you set in-camera and "bakes it in," making it difficult to change later without a loss in quality. A RAW file, on the other hand, simply records all the light data captured by the sensor. The white balance setting is stored as a metadata tag that you can change effortlessly in post-processing software like Adobe Lightroom or Capture One.
This means you can correct a blue or orange photo with a single slider, or even set it to the exact Kelvin temperature you want, with no damage to the image file. Shooting RAW gives you a complete safety net and ultimate creative freedom. You can use your in-camera white balance to get a good preview on your LCD screen, knowing you have the flexibility to make it perfect later. //
Does white balance affect raw files?
No, white balance does not permanently affect raw files. The white balance setting is only embedded as metadata, so you can freely adjust it in post-processing without losing any image data or quality.
How do I set white balance for indoor photography with mixed lighting?
Set a custom white balance using a gray card under your primary light source. //
Can I use a white balance card in low light situations?
Yes, but ensure the card is evenly lit by your main light source and not in shadows. Increase your ISO temporarily to get a proper exposure for the custom white balance reading, then return to your desired ISO for shooting.

Most of the out-of-this-world photos being beamed home from Artemis II were taken with an old-model Nikon camera that can be bought for about $1,000.
NASA traded in the legendary Hasselblad model it used on Apollo missions years ago for the Nikon D5 DSLR — a classic digital single-lens-reflex camera first released in 2016.
The Nikon was carefully selected for its proven track record as a workhorse space camera, as well as its extraordinary ability to pick up detail even in extreme darkness, Nikon’s top NASA consultant told The Post on Tuesday.
He said the Nikon D5 has been used successfully in space since 2017 — and “is still producing amazing images for them.”
One of the camera’s top-selling points for Artemis II was its incredible low-light capabilities, Corrado said.
The camera is able to shoot at an ISO — or light-sensitivity rating — of up to 3.2 million. //
“After this mission, it should be Z9. They won’t go back to the D5 after this,” he said. “Once they fully test and continue to test, the Z9 will be the camera going to the moon.”
Artemis II brought a total 32 cameras onboard for their 10-day mission.
Fifteen were mounted on the spacecraft, and 17 were handheld cameras the crew operated while peering out the cabin windows during their historic flyby of the lunar far side.
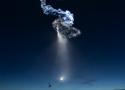
SPACE JELLYFISH PREDICTOR
My Orders
Relive your Memories.
Fill your KODAK Digitizing Box with any brand of tapes, photos, film reels and audio. Each piece will be hand-digitized in our state-of-the-art facility, and conveniently converted to digital, DVD, or the cloud.
Kodak Digitizing Box 2 Item
Kodak Digitizing Box 2 Item
$34.99$69.99
Convert up to 2 Tapes, or 2 Films, or 2 sets of 25 Pictures to Digital
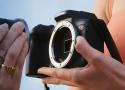
My pick for the best lens for the Canon R10 is the 28mm f/2.8 because the compact size and wide maximum aperture make it a versatile lens and affordable lens that will give you professional quality images. This is the first lens I’d suggest to buy with the camera or to replace the kit lens that came with it.
But depending on what you shoot most, you may want a different option. So keep reading to see my complete breakdown of the best lenses for the Canon R10 based on what might be right for you.
52mm Clip-0n CPL Phone Camera Lens Filter Kit, Circular Polarizer Polarizing Filter Compatible with Mostcell phones

A/I generated faces
The Permanence and Care of Color Photographs: Traditional and Digital Color Prints, Color Negatives, Slides, and Motion Pictures
by Henry Wilhelm
with
contributing author Carol Brower

The standard size for a wallet-sized photo is 2.3 x 3.5 inches (6 x 9 cm), which is the 2R size.
Get paid for your photos with 500px Licensing
Sell your photos, keep your copyright, and get your photography the attention it deserves.
Discover and share the world’s best photos
Get inspired with incredible photos from diverse styles and genres around the world. We're not guided by fads—just great photography.
WILDLIFE AS CANON SEES IT
This advertisements were featured in National Geographic.

Selected in
Nature
Unsplash Awards 2023