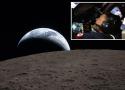
Most of the out-of-this-world photos being beamed home from Artemis II were taken with an old-model Nikon camera that can be bought for about $1,000.
NASA traded in the legendary Hasselblad model it used on Apollo missions years ago for the Nikon D5 DSLR — a classic digital single-lens-reflex camera first released in 2016.
The Nikon was carefully selected for its proven track record as a workhorse space camera, as well as its extraordinary ability to pick up detail even in extreme darkness, Nikon’s top NASA consultant told The Post on Tuesday.
He said the Nikon D5 has been used successfully in space since 2017 — and “is still producing amazing images for them.”
One of the camera’s top-selling points for Artemis II was its incredible low-light capabilities, Corrado said.
The camera is able to shoot at an ISO — or light-sensitivity rating — of up to 3.2 million. //
“After this mission, it should be Z9. They won’t go back to the D5 after this,” he said. “Once they fully test and continue to test, the Z9 will be the camera going to the moon.”
Artemis II brought a total 32 cameras onboard for their 10-day mission.
Fifteen were mounted on the spacecraft, and 17 were handheld cameras the crew operated while peering out the cabin windows during their historic flyby of the lunar far side.


SPACE JELLYFISH PREDICTOR
My Orders
Relive your Memories.
Fill your KODAK Digitizing Box with any brand of tapes, photos, film reels and audio. Each piece will be hand-digitized in our state-of-the-art facility, and conveniently converted to digital, DVD, or the cloud.
Kodak Digitizing Box 2 Item
Kodak Digitizing Box 2 Item
$34.99$69.99
Convert up to 2 Tapes, or 2 Films, or 2 sets of 25 Pictures to Digital
My pick for the best lens for the Canon R10 is the 28mm f/2.8 because the compact size and wide maximum aperture make it a versatile lens and affordable lens that will give you professional quality images. This is the first lens I’d suggest to buy with the camera or to replace the kit lens that came with it.
But depending on what you shoot most, you may want a different option. So keep reading to see my complete breakdown of the best lenses for the Canon R10 based on what might be right for you.
52mm Clip-0n CPL Phone Camera Lens Filter Kit, Circular Polarizer Polarizing Filter Compatible with Mostcell phones

A/I generated faces
The Permanence and Care of Color Photographs: Traditional and Digital Color Prints, Color Negatives, Slides, and Motion Pictures
by Henry Wilhelm
with
contributing author Carol Brower

The standard size for a wallet-sized photo is 2.3 x 3.5 inches (6 x 9 cm), which is the 2R size.
Get paid for your photos with 500px Licensing
Sell your photos, keep your copyright, and get your photography the attention it deserves.
Discover and share the world’s best photos
Get inspired with incredible photos from diverse styles and genres around the world. We're not guided by fads—just great photography.
WILDLIFE AS CANON SEES IT
This advertisements were featured in National Geographic.

Selected in
Nature
Unsplash Awards 2023
Since the analemma is considered one of the most difficult and demanding astronomical phenomena to image, I immediately set out on such a marathon during the summer of 2001 by pursuing a complete set of analemmas from 08:00:00 to 17:00:00 UT+2 (hourly intervals) as well as the special case of the perfectly vertical analemma on the meridian (12:28:16 UT+2). For complete details and analysis concerning the analemma on the southern meridian, the interested reader is referred to my article in Coelum Astronomia (Vol 60: 71-74, Feb/2003). The project's successful completion provided various firsts including the first analemma ever imaged in Greece; the first image ever of the perfectly vertical analemma; the first analemma(s) ever imaged during a single calendar year; the first to ever image more than one analemma; and the first to ever capture two analemmas on a single piece of 35mm film.
If you took a picture of the Sun at the same time each day, would it remain in the same position? The answer is no, and the shape traced out by the Sun over the course of a year is called an analemma. The Sun's apparent shift is caused by the Earth's motion around the Sun when combined with the tilt of the Earth's rotation axis. The Sun will appear at its highest point of the analemma during summer and at its lowest during winter. Today, the Winter Solstice day in Earth's northern hemisphere, the Sun is at the bottom of the analemma. Analemmas created from different latitudes would appear at least slightly different, as well as analemmas created at a different time each day. This particular analemma was built up by 46 separate Sun photographs taken during 2003 in Athens, Greece. Pictured in the foreground of this composite image are pillars called the Porch of Maidens, part of the ancient Erechtheum which was completed in 407 BC.
The animated motion of the analemma sun below was constructed from the original film negative containing the 46 single exposures. Its purpose is to illustrate the wandering motion of the sun during twelve months and whose net motion is described by the analemma curve or "figure eight". The bottom apex point represents winter solstice whereas the first solar disk to the immediate upper-left is the start of January and where we observe the gradual and steady increase in the sun's altitude from day-to-day. This increase continues into February and March and, by mid-April, we have reached the cross-over point between the two loops. The sun continues its steady rise across local skies but is now on the right portion of the upper loop and which peaks at the apex point of the upper loop on summer solstice. It is at this point that the sun will now start another gradual and steady pace but this time with declining altitude and where, during July and August, it will traverse the left side of the upper loop. We reach the cross-over point once again but this time at the end of August with the sun now losing altitude at a greater pace while it is now on the right side of the lower loop and which will climax with the winter solstice and the apex point once again.
Incredible as it may sound, only seven times has someone ever managed to successfully image the solar analemma as a multi-exposure on a single piece of film. An analemma is basically the figure "8" loop that results when one observes the position of the sun at the same time during the day over the course of a year. As a result of the earth's tilt about its axis (23.5°) and its elliptical orbit about the sun, the location of the sun is not constant from day to day when observed at the same time on each day over a period of twelve months. Furthermore, this loop will be inclined at different angles depending on one's geographical latitude.
As suggested by the relatively few number of successfully completed analemmas (seven total including the pioneering photo in 1979), the imaging of the sun over local skies during the course of twelve months is considered one of the most difficult and demanding astronomical phenomena to image. The analemma presented below is one of TEN analemmas completed during a marathon started in 2001 in an attempt to document the complete range of analemmas from sunrise to sunset (see here). It is further unique as it represents the fifth of eight analemmas ever imaged during a single calendar year and also the fifth analemma ever imaged in Greece.
Note: For an animation involving the analemma at 13:00:00 UT+2 and which beautifully documents the actual motion of the sun during twelve consecutive months when observed at precisely 13:00:00 UT+2, please see the example here.
Note: As noted elsewhere, more men have walked on the moon than have successfully photographed the analemma (see S&T, Dec/2003: 73).

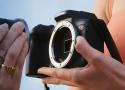
When it comes to glass it's all about lighting direction.
You want to make sure that when you look at the picture through the camera neither the reflection of the lightsource or anything lit by your lightsource is visible.
Hold up, I'll draw a diagram: //
3
I happen to frequently photograph artwork, including framed and with glass.
If possible, do this in a room that has black walls and no windows. If such room is not accesible, wich is my case, I use a black backdrop BEHIND the camera. This helps a lot against unwanted reflections. Also, as the other answers point out, place the lights a 45 degree or more relative to the line from the lens to the center of the artwork. It means, 2 simetrical lamps, one at each side and at the same distance from the front and from the sides of the artwork.
For example, if dealing with a 1 meter wide painting, lamps would be rougly 1 meter in front of the painting and 1 meter away from the edge of the painting. Lamp heads would be at the height of the horizontal centerline of the piece. Partly close the barn doors to limit light output so it falls only on the painting.
I Use a tripod and fire the camera using a computer and a usb cable. This is to avoid unwanted movement of the camera and to avoid my own reflection on the glass. ....
When framing, the lens axis should point perdendicular to the center of the artwork (specially if it's rectangular) to avoid perspective distortion. (It's correctable in post, but preferable not having to...) //
This works well but I have, in extreme situations, used a black drop cloth with a hole cut in it for the camera lens so the camera, and photographer, are behind the cloth.
To photograph artwork, you'll need as flat and uniform a lighting setup as possible. Ideally, four lights from each corner to minimize any variation. You should use an incident meter to verify that the the light varies by no more than 1/4 stop across the artwork.
You don't need to use softboxes - bare bulbs are sufficient, if placed far enough away to minimize falloff. Minor differences due to age and color of softboxes can result in varying color temperature across your scene. This is less likely with bare bulbs. Make sure that the flash tubes are not too different - you can test this by shooting images of a grey card illuminated with each light, in turn. You should have a white balance temperature variation no greater than 150-200K, 100K if you're lucky.
Once you have the lighting set up, use a Gretag Macbeth color checker to obtain a reference color image, which you can use to profile your camera for the specific lighting setup.
Export images to 16-bit TIFF and Adobe 1998 color space - this should be more than enough for clients.